| Freshwater Fishing |
| Saltwater Fishing |
| Our Boats |
| Bookings & Reservations |
| News |
| Reports |
| Marlin Bar |
| Photo Gallery |
| Fish Species |
| Fishing Rigs & Techniques |
| Knots |
| Links |
| About Us |
| Contact Us |
| Live Support |
| Site Map |
Swim Bait Rigging
Step by Step.
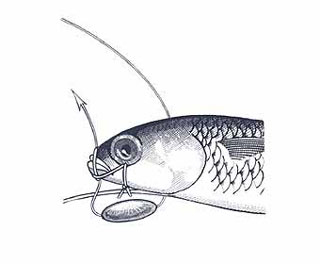
Extend a tube into the gills and out through the anus of the fish. |
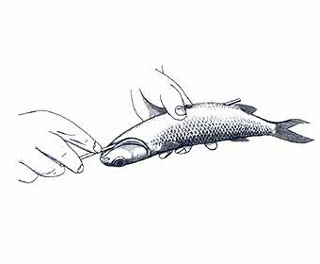 |
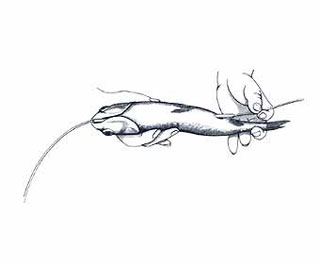 |
Push your leader through the tube then remove the tube leaving the leader in place. |
Attach a suitable size hook to the leader. The knot shown is suitable for heavy monofilament leaders but you will have to use a metal sleeve of the correct size and a crimping tool, if you are using a 49 strand wire leader. |
 |
 |
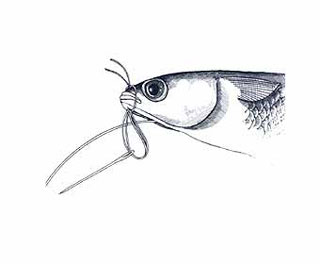
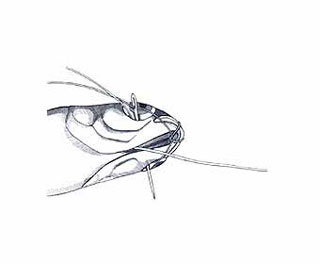
Now we have to stitch the mouth and gills closed. Begin by looping a 40 cm length of thread over the nose so the loop lays under the head of the fish. Then, thread the eye of your stout needle with both tag ends and drive the needle down through the nose of your bait fish from top to bottom and forward of the underslung loop. You may need your awl to initiate the puncture. |
Pull the needle right through and with it, both tag ends of the thread. |
 |
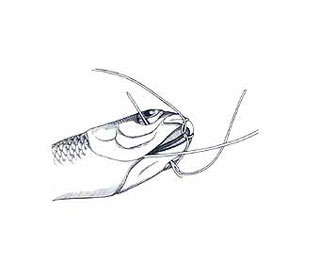 |
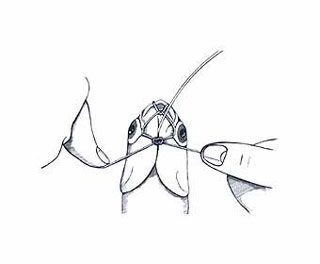
Now, re–thread the needle with one tag end and pass it through the eye tunnel of the fish as shown. |
Pull the needle right through and with it, the tag. Then thread the needle with the other tag end and pull it through the eye tunnel of the fish in the opposite direction. |
 |
 |
Tie both tags together using a granny knot and pull the entire stitch really tight. Now, it is important to use a knot that slips, like a granny, otherwise the knot might lock before the stitch becomes really tight. |
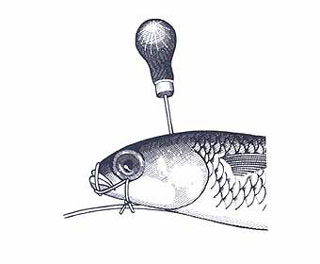
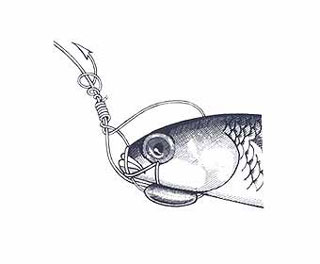
Use your awl to make a puncture central to the head of the fish only far enough back on the head to allow space for a suitable size bean sinker to be rigged under the head. |
 |
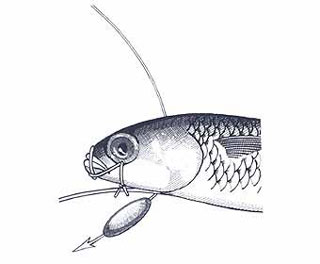 |
Take about 40 cm of galvanised wire and push it right through the puncture made by your awl. Then thread on your bean sinker which should be about the size shown in the diagram relative to the baitfish you are rigging. |
Push the tag of the wire back up through the hole originally made for the mouth stitch. |
 |
 |
To form the towing bridle, raise the leader protruding from underneath the gills to a fairly sharp angle to the head of the fish. Bend the wire protruding from the head forward, then sharply upward, to lay alongside the leader. Then commence a series of firm wraps around both leader and head wire with the wire protruding from the top of the fish's nose. |
Having made a series of firm wraps around both leader and head wire, finish off by making another series of firm wraps around the leader with the tag of the protruding head wire. |
 |
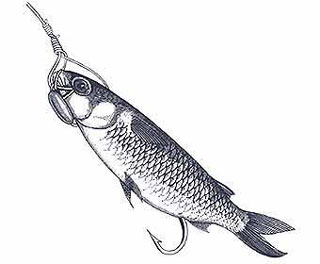 |
The result should look something like this with the fish secured on a bridle, which – in combination with the sinker under the head – should make it swim in an attractive manner beneath the surface when towed directly from the rod tip. |